My Prior Experience
Project management as its own discipline is very new to me. Of course, I have known that professionals use organized strategy and advanced diagrams to advance their goals; but I didn’t even know until recently (this week, actually) that project management on its own is an established career that pays well.

My closest experience with project management was at my old job at a sign shop, where there was a very old-school method of organizing projects via a giant magnetic board and dry erase magnets, like in the picture on the right. For example, one would write down a client’s order on a magnet with a certain stripe on it that would indicate what type of order it is (yellow for rush, red for expedited, or none for normal). Then it would be placed in the ‘orders’ section; and once a draft is complete, a proof is sent to the client and that magnet would be moved to the ‘waiting’ section. Once the client finally approves of the design, the magnet is then moved to its appropriate section for production (print, fabricate, send eps file to third party, etc.).
The magnetic board was effective for organizing and prioritizing projects and for making sure nothing gets lost—most of the time. However, when it comes to project management via digital applications, I have had zero experience (unless Google calendar counts, which is what my team used at my past internship). Therefore, I needed to do some research in order to follow through with my next graduate project.
My Research
For brevity, I will primarily talk about project management application rather over project management theories (for there are many out there!). Upon viewing the lectures given by one of the professors in my program, Professor Hastings, I was exposed to several free project management apps; and I had to decide which one to use. Although I was not limited to those specifically, I was not exposed to any sort of project management apps through my previous positions; so I wanted to try these out for now.
For me, learning through visuals is the best approach because I remember the best when I see the ‘thing’ that needs to be taken care of. There was one app from the list called Trello which I found the most visually compelling; and Professor Hastings agreed that it was her favorite. The fact that you could upload your own images as covers to projects, and put unique color labels on projects, was enough to convince me that Trello would be the most helpful app for me. The app even has an image search plugin which embeds the chosen image to where you want it, which saves a lot of headache in my opinion.
My Organization Process
With my chosen app, I could now set up my first project management workspace, which should effectively manage the course I am currently taking. At this point, I had to decide exactly how I should organize the course.

Looking at the templates, I noticed that some of them had sections that pertained to time such as ‘to do,’ ‘doing,’ and ‘done.’ This somewhat resembled the old-school magnet board at the sign shop. However, I found this method a bit redundant, given that the app has a built-in checklist that will cross off completed items and then appear green once everything on the checklist is complete. Also, it felt vague when it came to organizing the type of coursework. I think this process would be more useful for personal goals, though.
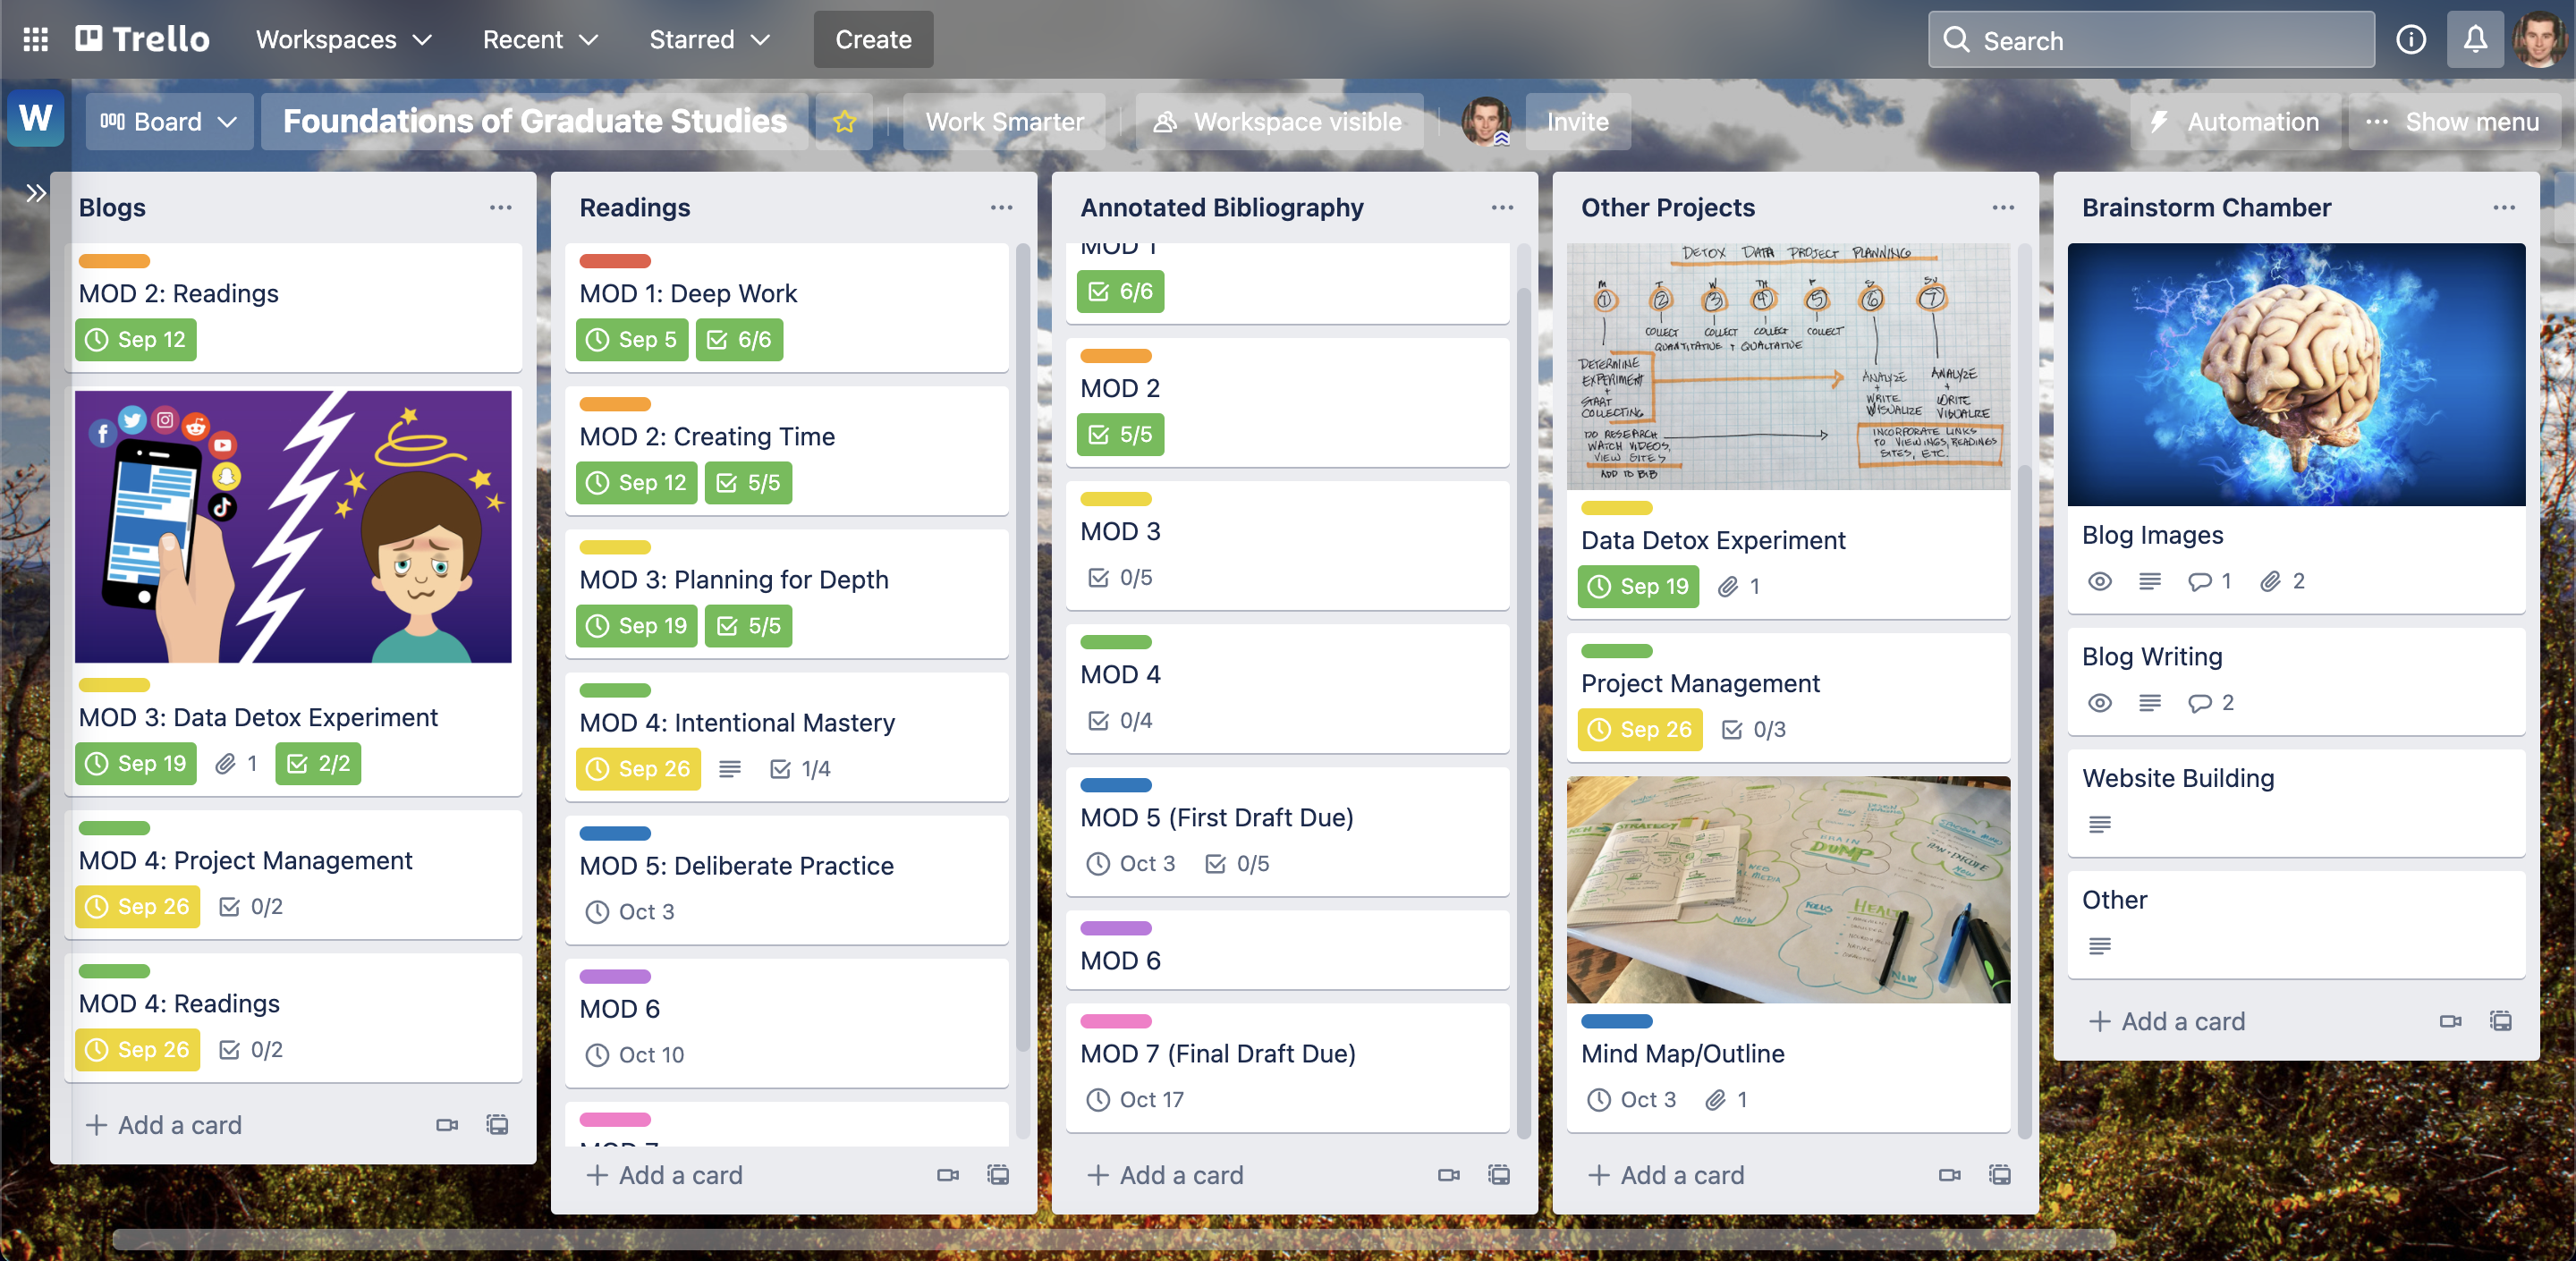
Therefore, because I found that there are distinct categories of work in the course, I decided it would be best to create separate sections for each type of coursework. This includes readings, blog posts, the annotated bibliography, and miscellaneous work that is unique to each module.


But what about the modules themselves? Wouldn’t it be effective to organize via the modules so that I would know what needs to be done each week? Well, I found that assigning each module to a distinct color label—another helpful feature Trello provides—in addition to inserting the module name in the projects where appropriate, was effective for me. I even put the color labels in ROYGBIV order, with Module 1 being red and Module 7 being pink (I assigned purple/pink instead of indigo/violet).

Additionally, the modules and their respective color labels are the primary project titles for most of the sections (the ones that aren’t are still denoted by their respective color labels). A checklist broke each project down into smaller tasks, such as to insert a blog image and writing piece under each blog assignment, all the readings to be done under each module for the readings section, and all the sources to cite for each module in the annotated bibliography section.
Furthermore, I added a brainstorming section which allowed me to jot down creative content ideas that would randomly pop up in my head. This could potentially be used for better building my blog images, writing, and website.
Final Thoughts
When all put together, the screenshot below as well as this link show what it looks like thus far. It is still a work in progress, and I would not apply this process to all other boards or workspaces, since they require different mindsets. This is what I found most efficient for my current coursework, and I would be open to new processes. As I continue on my project management journey, perhaps I will find better ways to organize, strategize, and visualize.


